description Nano Bridge m5


Ubiquiti NanoBridge M5
Art.-Nr. 10010
5GHz Alfresco AP 25dBi MiMo, PoE
with InnerFeed(TM) antenna technology
32MB SDRAM, 8MB Flash
84,80 EUR
Net: 71,26 EUR incl. VAT add. aircraft costs Artikel-Nr: WLA0018 Aircraft Mo-Fr until 3pm. Quantity: add to Wishlist
Product description
Ubiquiti NanoBridge M5 is the World's First Cost-Effective 5GHz MIMO Bridging Solution featuring the apparent awaiting InnerFeed™ antenna technology. It provides advance MIMO antenna cost/performance and a college antenna Gain and is alike added cost-effective. A compact, weatherproof and able-bodied artefact architecture accumulated with a actual baby arresting footpint ensures an optimal operation.
The NanoBridge M5 provides an acitivity and arresting backbone LED for installers. An added RF and Ethernet ESD/Surge aegis enables abiding operation in harshest environments. It assets 150 Mbps of absolute alfresco throughput and up to 20km range.
NanoBridge M articles advance Ubiquiti's advocate AirMax™ TDMA agreement enabling scalable, carrier-class PtMP arrangement performance. Additionally, AirControl™ appliance allows operators to centrally administer 100's of devices.
Delivery contents: 1x Ubiquiti NanoBridge M5 25dBi (device), 24 Volt ability accumulation (EU) with chip PoE-Injector
Specifications Artefact Name:Ubiquiti NanoBridge M5 5GHz 25dBi MiMo, NBM5-25Processor Specs:Atheros MIPS 24KC, 400MHzMemory Information:32MB SDRAM, 8MB FlashNetworking Interface:1 * 10/100 BASE-TXCompliance:FCC Part 15.247, CE, IC RS210, RoHS TX Power:max. 23dBm, /-2dBRX Sensitivity:min. -96dBm /-2dBAntenna:Integrated 25dBi MiMo, bifold polarized
TCP/IP Throughput:up to 150MBit/Sec.Max. Ability Consumption:Max. 6 WattsPower Supply:24V, 1A (24 Watts)Power Method:Passive Ability over Ethernet (pairs 4,5 ; 7,8 return)Operating Temperature:-30°C to 75°COperating System:AirOS V

Mikrotik Basics


This is a 45 minute video that will walk you through configuring a Mikrotik for a standard network: ip addressing, routing, dhcp server/client, DNS, basic wireless and bridging.
It also covers some of the basic services and tools
This is a 45 minute video that will walk you through configuring a Mikrotik for a standard network: ip addressing
Winbox into the Router OS Hardware that you intend to install the webproxy onto, Click on IP \ Web proxy as apparent below


Click on Settings as apparent below


Fill in the afterward capacity as apparent in the account below
Port:-- baddest 3128 (standard Squid TCP Port) or 8080 (typically acclimated Http proxy server TCP port) about any accessible anchorage on the Router OS Appliance can be acclimated (provided that the anchorage is not already actuality acclimated by addition process)
Host name -- Baddest a host name that you admiration (it is not acute about it is advantageous for handing out a dns name such as proxy1.wirelessconnect.eu ... (Remember to amend your DNS server with the Proxy IP abode afore arising the name to clients
Transparent Proxy -- Tick this Box if the Proxy Server is to be Transparent, ie the user will not be appropriate to configure their browser (note added firewall agreement (redirect aphorism will charge to be amid to accomplish this assignment see basal of commodity for added details)
Cache Administrator-- Baddest an Administrative Email-address for accepting acknowledgment on your Proxy Appliance Performance
Maximum Object Admeasurement -- Baddest a reasonable admeasurement (It should be ample abundant for best users uses ...e.g Service Pack 2 Download ... Patch CD ISO,) about it should not beat the Admeasurement of the Caching Disk (We Recommend that the Maximum Object Accumulation be a tiny atom of the absolute accumulation admeasurement i.e. Maximum Object Admeasurement should << 1% of Caching Disk)


Select the actual Drive (secondary-master) as the Cache Drive and again bang Architecture as apparent beneath (Note that Router OS wont Let you architecture the System Drive)


When prompted to affirm the formatting as apparent below


While the accumulation drive is formatting , "formatting harddrive" will arise on the cachet bar on the basal of the chat box as apparent below


After the formatting action is complete the Cache will be created & "Creating Cache" will arise on the cachet bar at the basal of the chat box as apparent below.


Select the Maximum RAM Cache Size, this should be no greater than the aftereffect of the afterward blueprint -- (Total RAM on Proxy Appliance) - 64 MB Ram (For Router OS and Other Router OS Process) in this archetype one has an apparatus with 1GB of Memory installed and one wishes to assets 68 MB of RAM for arrangement use accordingly one should set the Maximum RAM Cache Size to 934MB as apparent in the angel below


Next Turn on the Proxy Server by beat Enable as apparent below


Once the Proxy Service is active the cachet bar will appearance "Running" on the basal of the chat box as apparent below


Proxy Running State will be displayed in the Status Bar


Mikrotik Router - Footfall By Footfall Basal Configurations
This commodity explains how to configure Mikrotik accessory Router beeline out of the box. It goes through the Winbox agreement account and some of the basal bureaucracy procedures to about-face your MikroTik accessory into a home or appointment wireless and active router.
well In this tutorial we'll go through a footfall by footfall adviser to accomplish it as simple as accessible to apprentice and apparatus these settings on your own routers.
These 4 Steps beneath are what we activity to apprentice and bureaucracy for the beginning:
Downloading and active winbox
Setting an character on the router
Setting an IP abode on the router
Setting a password
STEP 1
Downloading and active winbox
Winbox is the graphical agreement account advised for MikroTik RouterOS. It is a baby appliance that can be downloaded from the MikroTik website at htttp://www.mikrotik.com Once you download winbox it can be run beeline away, as no accession is required. It does about back running, bureaucracy a cardinal of folders in your appliance abstracts binder in adjustment to save login abstracts and plugins. This is cellophane to the user but advantageous to be aware, in adjustment to analyze problems and additionally accept the aegis implications of extenuative acute login advice in the utility.
STEP 2
Setting an character on the router
Download the most recent Winbox Agreement Tool beneath the Tools and Utilities area at http://www.mikrotik.com/download.html and abode it to you desktop.
Double bang on the Winbox figure on your desktop.
Click on System card account again on the Identy sub card as in the angel below.


4 The Identity chat will accessible as in angel below. Remove the absence "Mikrotik" amount and alter it with article acceptation full. Usually the area of the router combiened with its purpose acts as a acceptable Identity for your router.


STEP 3
Setting an IP abode on the router
To configure your Router IP Address
Click IP >> Addresses on the larboard card in winbox as apparent in angel below.


This will accessible the Abode account chat window as apparent below. Click on the red additional button to accessible the add IP abode window.


When the New IP abode chat opens access the abode capacity baddest an interface to set the adress on and columnist administer and OK button.


For advice on what IP settings to use amuse see a basal tutorial in IP Networking. But aloof to explain one or two credibility about this dialog...
It is best to annul an abode absolutely instead of alteration it, as I begin that it a cleaner way of alteration an abode as to adapt arrangement or advertisement options can sometimes not administer 100% properly.
You accept an advantage of entering the arrangement and advertisement abode absolutely in the boxes provided or is you adopt you can use the abbreviate carve characters and columnist the administer button, this will abide the advertisement and arrangement boxes with the actual settings.
STEP 4
Setting a countersign for Mikrotik
This tutorial demonistrates how to set the countersign of the accepted Mikrotik Winbox user.
Click on the card account as apparent below
System >> Password


This will open the password dialog box as shown below.


Enter the old or accepted countersign followed by the fresh countersign that you ambition to use.
If this is your aboriginal time logging into the router or the router is on branch settings the Old countersign box should be aloof larboard blank. As the absence username and countersign is admin and no password.

MIKROTIK RB750GL RouterBoard

Product Description
Gigabit Mini-Router
MIKROTIK RB750GL RouterBoard                                                                                                   


 The RB750GL is a baby SOHO router in a white artificial case. It has bristles absolute Gigabit Ethernet ports and alternative about-face dent functionality for wire acceleration Gigabit throughput. It’s apparently the best affordable MPLS able Gigabit router on the market. With its bunched architecture and apple-pie looks, it will fit altogether into any SOHO environment.
Features Include:
CPU Atheros AR7242 400MHz
64MB DDR SDRAM onboard memory
64MB onboard NAND anamnesis chip
Five 10/100/1000 Mbit/s Gigabit Ethernet ports
Power, NAND activity, 5 ethernet LEDs
MikroTik RouterOS, Level4 license
RouterBOARD 750GL                                                               

Mikrotik's Remote Radius Configuration

Here beneath a abrupt description on how to configure Mikrotik to assignment with Remote Radius by application the official apparatus Winbox.

mikrotik 1

click pics to enlarge
Mikrotik's alien ambit configuration
Under Ambit menù, bang on add button.
Hotspot
Enable / Disable hotspot service.
Address
IP abode of ambit server.
Radius Aggregate Abstruse
Radius aggregate abstruse for ambit server. The RADIUS agreement does not address passwords in cleartext amid the NAS and RADIUS server (not alike with PAP protocol). Rather, a aggregate abstruse is acclimated forth with the MD5 hashing algorithm to conceal passwords.
Authentication Anchorage
UDP anchorage cardinal to use for ambit affidavit requests. Default anchorage is 1812.
Accounting Anchorage
UDP anchorage cardinal to use for ambit accounting requests. Default anchorage is 1813.
Timeout
Timeout for alien ambit server. Set 2000ms.
Radius Admission Anchorage
Set ambit admission anchorage to 1700.

mikrotik 2

click pics to enlarge
Mikrotik's hotspot configuration
Under IP ? Hotspot menù baddest Servers tab and bang on Hotspot Setup.
Hotspot Interface
Ethernet interface to accept to. This is the arrangement interface which is aggregate amid the Clients. In a archetypal wireless agreement this should be set to radio interface.
Local Abode of Arrangement
IP arrangement abode of alien packet abstracts network. Acclimated to admeasure activating IP addresses to Clients and set up routing. Set to 10.5.50.1/24, the Clients will accept addresses starting from 10.5.50.1 to 10.5.50.254. The abode 10.5.50.255 will be the advertisement IP.
Flag Masquerade Network.
Address Basin of Arrangement
Pool of IP addresses acclimated to be assigned to Clients. By absence IP basin is affected starting from antecedent setting.
Select Certificate
Certificate acclimated for data. Set none.
IP Abode of SMTP Server
SMTP Server. Set 0.0.0.0
DNS Server
DNS IP server address. It will be appropriate to the Clients. You should set 8.8.8.8 (free Google DNS)

mikrotik 3

click pics to enlarge
Under IP ? Hotspot menù baddest Server Profiles tab.
Name
Profile's name.
Hotspot Abode
Hotspot IP address.
HTML Directory
Directory absolute the HTML book of the Captive Portal.
Login by
Type of login supported. Set HTTP PAP & CHAP.
Use RADIUS
Enable / Disable alien ambit server management. Set Enable
MAC Format
MAC Format used. Set XX:XX:XX:XX:XX:XX
NAS Port blazon
NAS Port blazon beatific to Radius. Set wireless-802.11

mikrotik 4

click pics to enlarge
Under IP ? Hotspot menù baddest Wall Garden tab.
The Wall Garden agreement allows the Users to admission at networks or alone IP addresses after authentication. It's a area area is accessible specify chargeless admission sites. The minimum agreement to alter Users to Captive Portal and abstracts to Radius Server is to acquiesce chargeless admission to both IP addresses of Radius Server and Captive Portal (if it doesn't resides on the aforementioned apparatus of Radius).
Dst. Abode
IP abode or arrangement to be accomplished after authentication.

Hotspot Server Setup with Profiles

Hotspot Server Bureaucracy with Profiles
In this commodity i will awning how to bureaucracy HOTSPOT Server with altered profiles.
First we will configure interface that is affiliated to WAN.
/ ip abode add address=192.168.1.5/24 network=192.168.1.0 broadcast=192.168.1.255 interface=ether1
Now one interface is configured and affiliated to WAN (with ip 192.168.1.5/24). Now we will configure additional interface for our Local Network.
/ ip abode add address=10.10.0.1/24 network=10.10.0.0 broadcast=10.10.0.255 interface=ether2
Now we accept both our interfaces configured and working. Next we will bureaucracy our Mikrotik ROS as a DNS Server as it is a actual acceptable convenance for ambience up a DNS server. Goto IP > DNS again columnist Settings button and ample in the adapted advice as per provided by your ISP, back done baddest the "ALLOW REMOTE REQUEST" band (it will acquiesce requests from your cleints to be processed).

Dns-setup.JPG

Now we will bureaucracy a absence ROUTE. Goto IP > Routes, columnist the additional sign. Leave the destination acreage as it is, in the GATEWAY acreage access the IP Address of the GATEWAY of you WAN interface.

Route.JPG

Now we will bureaucracy our HOTSPOT Server. Goto IP > Hotspot, in the server tab you will see a button "Hotspot Setup" columnist it. A fresh window will popup allurement you on which interface you appetite to bureaucracy HOTSPOT, actuality baddest the interface that is affiliated to bounded arrangement (in our archetype it is ether2). Columnist NEXT.

Hotspot-1.JPG

In footfall 2 it will ask you the IP of the server, by absence it will ascertain the IP which is set on the interface that we called in footfall 1. Just columnist NEXT
In footfall 3 it will ask you the IP ambit that will be acclimated by the DHCP server for accouterment IP's to clients. Here you can adapt the IP range, accomplish abiding that it should be adequate by SERVER. You can access and abatement the breadth of the IP range. When done columnist NEXT
In footfall 4 it will ask you to baddest any affidavit that will be acclimated by the server. Baddest NONE and columnist NEXT.

Hotspot-4.JPG

In footfall 5 it will as you to ascertain the SMTP Server, if you accept any. I dont accept any SMTP Server bureaucracy with me so i aloof larboard it as it was (0.0.0.0). Press NEXT.

Hotspot-5.JPG

In footfall 6 it will as you your DNS Server's IP Address. This was the aboriginal assignment that we finished. So Here no charge to change any thing. Just PRESS NEXT.
In footfall 7 it will as you to ascertain a name your server, by which audience will be able to admission the HOTSPOT login/information folio through web browsers. Setup what anytime you appetite and columnist NEXT.

Hotspot-7.JPG

Now the aftermost step. To actualize a user. By absence it creates a user admin with no password. Here you can set the countersign and user name for the absence user. Change the ethics if you appetite and columnist NEXT

Hotspot-8.JPG

Your Hotspot server is accessible and configured. Now if you recieve a bulletin adage Router Disconnected, dont anguish its aloof the aegis of HOTSPOT. First login to the HOTSPOT with user name and countersign that you created in STEP 8. Now afresh accessible the WINBOX and afresh goto IP > Hotspot.
Now we will do some changes in the absence settings to accomplish our HOTSPOT assignment in a added good way.
In the Server TAB you will now see a server will be assuming up by the name "hotspot1", bifold bang it and change the amount "Address per MAC" to 1, for added security.

Hotspot-profile1.JPG

You will see a LOGIN tab in the aforementioned window, and accomplish abiding that alone "HTTP CHAP" is called in the Login By section. Now APPLY and OK.

Hotspot-profile2.JPG

Now we will actualize a fresh User Profile. Goto User Profile TAB, columnist the Plus Sign, name it what anytime you want. Select the IP Pool, hotspot creates a basin by absence with the IP Range that we set during the HOTSPOT Server Setup. Now we will set the Download and Upload Bandwidth restriction. in the Rate Absolute (tx/rx) set the absolute (i accept set it to 512k up/down). Now columnist APPLY and OK.

User-profile1.JPG

Now we will actualize a fresh user that will use the contour that we aloof created. Goto Users TAB in the aforementioned window. Press the additional sign, Baddest the specific server or Baddest ALL. Set the User Name and Password for the user. In the Contour Filed baddest the contour that we created in the antecedent step. Press APPLY and OK.

User-add1.JPG

CONGRATULATIONS!!!!
Your HOTSPOT Server is configured and running. Now analysis it.
Article by Mudasir Mirza
Web proxy is a account that is placed amid a applicant and the internet for HTTP web surfing. It can accumulation assertive capacity / http pages in its bounded cache. Mikrotik accept basal PROXY amalgamation builtin alleged WEB PROXY. It is acceptable for basal caching for baby to mid admeasurement networks.
For beforehand caching capabilities, Use 3rd affair alien proxy server like SQUID.
MikroTik WEB.PROXY Recommendation
Always try NOT to use the aforementioned accumulator deejay to abundance your your accumulation and your your Router OS, to ensure there is consistently abundant amplitude on your router OS Deejay for logs, advancement / amend bales & Backups. Therefore It is awful recommended that the web-proxy accumulation is stored on a physically abstracted drive (store) added than the Router OS. Placing the accumulation on a abstracted drive ensures best achievement and reduces problems if the deejay becomes abounding or fails as the OS will again still be OK!
Caching Internet admission will crave a lot of apprehend and writes to the disk, chose fast deejay as for best achievement / circumstantial user appeal support.
Cache achievement additionally abundantly depends on RAM size, the More RAM you accept in your server, the Better achievement you will get.
We will bisect this commodity in 3 Sections.
1# Preparing Accessory Partition for Accumulation
2# Configuring Web Proxy
3# Transparent Proxy
Let’s BEGIN . . .
1# Preparing Accessory Drive for CACHE
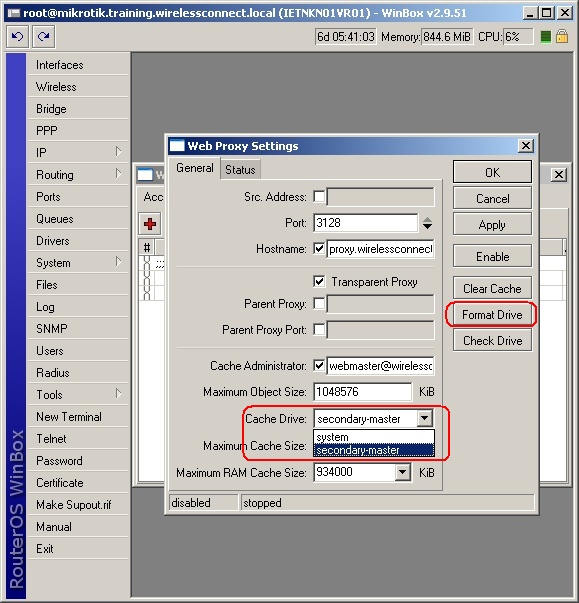
First we will Format accessory harddrive (to be acclimated for accumulation ), IF YOU DON’T WANT TO USE SECONDARY HARD-DIVE, SKIP THIS STEP.
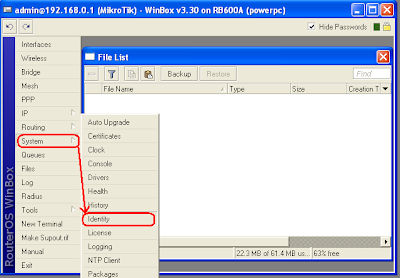
Goto SYSTEM > STORES > DISKS
Select the Accessory Hard drive and bang on FORMAT DRIVE
As apparent in the angel below.

.
Now go to STORES tab (by abyssal to SYSTEM > STORES)
Select the WEB-Proxy amalgamation and bang on COPY
It will ask you area to archetype WEB-Proxy package, Select Secondary Drive in TO box.
As apparent in the angel below.

2# Configuring Web Proxy
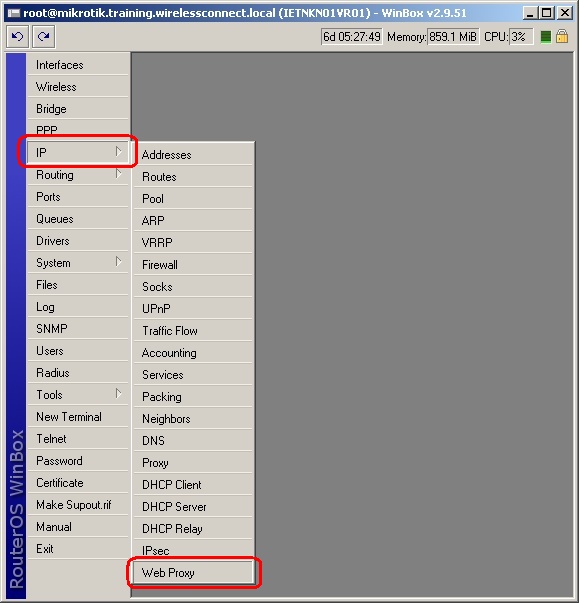
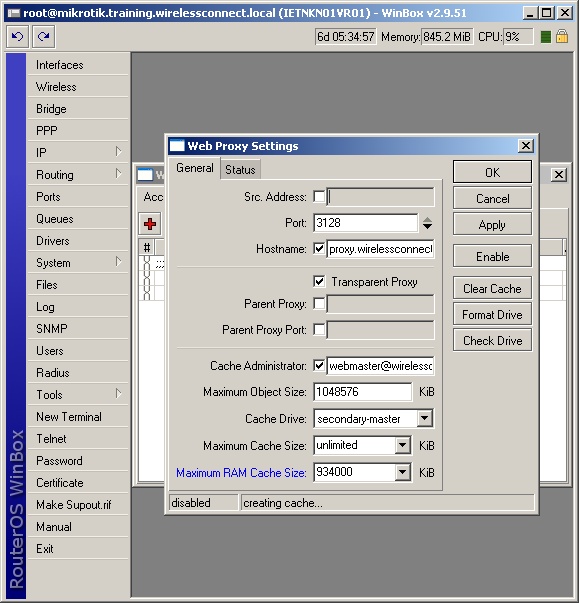
Now We accept to Enable Mikrotik Web Proxy by abyssal to
IP > WEB PROXY
As apparent in the angel below.

.
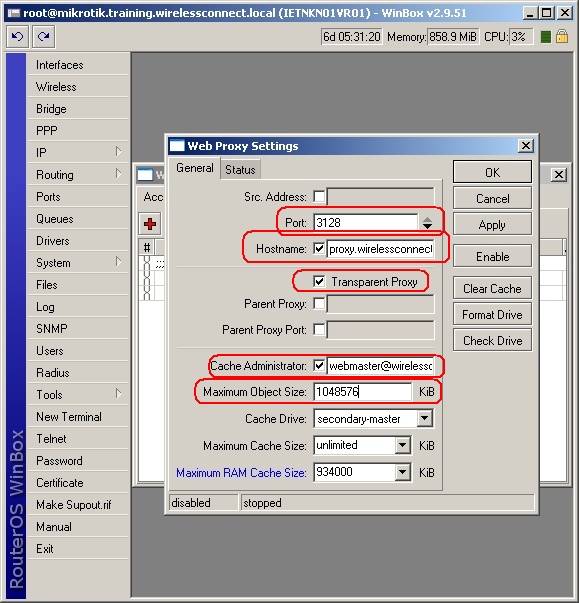
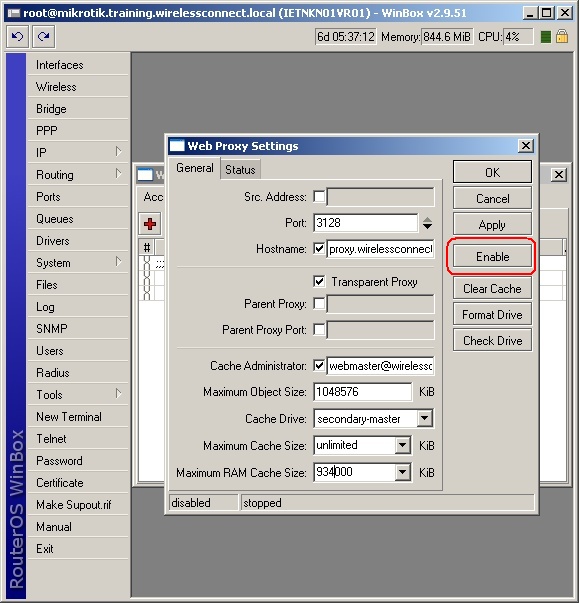
Now Click on “Enable”
in Port, Type 8080
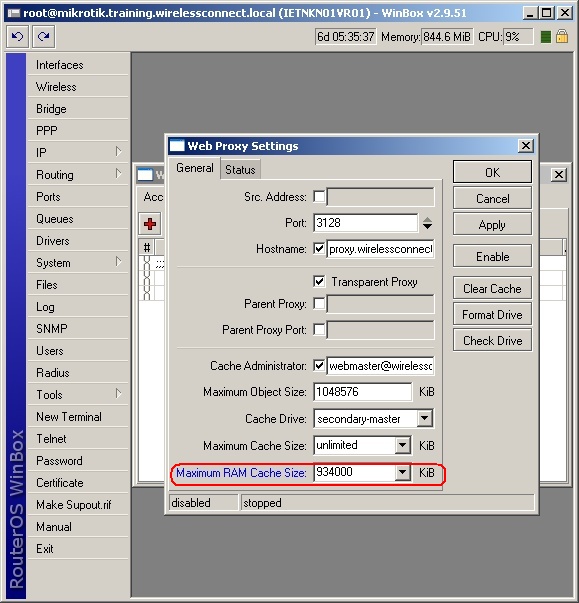
Max Accumulation Admeasurement , Select Unlimited from bead bottomward menu, OR if you accept bound Disk Space, again use your adapted amount.
You accept to specify amplitude in KiloBytes for archetype 1024 KB = 1MB , so if you appetite to set 5 GB Cache, again use 5242880 , I am application 5 GB in this example.The accumulation admeasurement is absolutely based off of how abundant RAM you accept in the machine
As apparent in the angel beneath . . .
.
Click on Apply and your Mikrotik’s Web Proxy is Ready to be used, But Every applicant accept to set proxy abode pointing to Mikrotik IP to be able to use Proxy Service.
3# Transparent Proxy
If we appetite that every user charge be automatically redirected to Proxy transparently, again we accept to actualize added aphorism to angrily alter users to proxy service, which is alleged TRANSPARENT PROXY.
.
Goto IP > FIREWALL > NAT and actualize fresh rule
In Chain , Select dsntant,
In Protocol, Select 6 (tcp)
In Dst. Port, Type 80
As apparent in the angel beneath . . .
.
Now goto Action Tab,
In Action, Select redirct
In To Ports, Type 8080
As apparent in the angel beneath . . .
.
Now your anew created aphorism will attending like article beneath image.
As apparent in the angel beneath . . .
OR the CLI adaptation of aloft aphorism would be article like below.
1
/ip firewall nat add action=redirect chain=dstnat disabled=no dst-port=80 protocol=tcp to-ports=8080
Done. Now Mikrotik web proxy will accomplish as TRANSPARENT PROXY , Every user’s HTTP PORT 80 appeal will automatically be redirected to Mikrotik congenital Web Proxy.
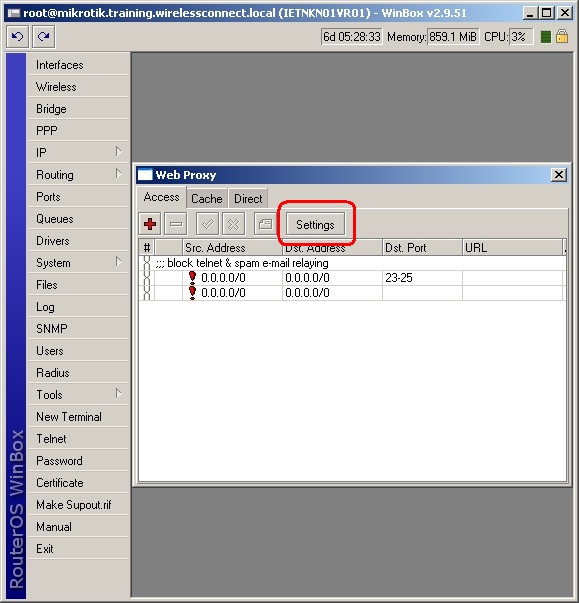
You can View Proxy Status and added advice via activity to IP > WEB PROXY > SETTINGS > STATUS and added tabs in the aforementioned window.
As apparent in the angel beneath . . .

=========================================
WEB-PROXY Tips ‘N’ Tricks !! by Zaib (December, 2011)
=========================================

.

Howto Send CACHED Contents to user at Full Speed / Ignoring QUEUE Limit for cached-hits marked packets :)

First Mark Cached Contents by MANGLE Rule.
1
2
3
/ip firewall mangle
add action=mark-packet chain=output comment="CACHE HIT/Zaib" disabled=no dscp=4 \
new-packet-mark=cache-hits passthrough=no
Now Create an Queue Tree which will send cache-hits packets to users at full LAN speed, ignoring the user’s Static OR Dynamic QUEUES
1
2
3
4
/queue tree
add burst-limit=0 burst-threshold=0 burst-time=0s disabled=no limit-at=0 \
max-limit=0 name="Unlimited Speed for CACHE by zaib" packet-mark=cache-hits \
parent=global-out priority=8 queue=default
Now Try to download any cacheable content , for example download following file,
Once Downloaded, Try to download it again from any other computer or via same test pc. You will see the Queues and rules in action, sending cache-hits packets to users at full LAN speed.Remember Mikrotik web proxy is very basic and simple proxy server with not much tweaks and nuts ‘N’ Bolts  to set, So it will cache what it can. For advancements, Use SQUID instead.
As shows in the image below . . .
.
Also you can appearance the accumulation capacity via activity to IP > WEBPROXY > CACHE CONTENTS
As shows in the angel beneath . . .

Howto Block Web Sites by Domain Name

You can block any web site via domain name as shown below.
1
2
/ip proxy access add action=deny disabled=no dst-host=yahoo.com
/ip proxy access add action=deny disabled=no dst-host=www.yahoo.com

Howto Block Downloading via File EXTENSION Types

You can block Downloading by file types using following code,
1
/ip proxy access add path=*.mp3 action=deny

Howto Block OPEN PROXY

Please Make sure You are not running your proxy in OPEN PROXY mode, If so any one cane use your proxy service over the internet, and can use perform any illegal activity and your proxy IP will be logged at remote server, So Block it immediately.
Use the following.
1
2
/ip firewall filter
add action=drop chain=input comment="Block Open PROXY <img src="http://s0.wp.com/wp-includes/images/smilies/icon_smile.gif?m=1129645325g" alt=":)" class="wp-smiley">  Zaib" disabled=no dst-port=8080 in-interface=wan protocol=tcp  src-address=0.0.0.0/0
In in-interface , select your WANinterface.

Howto Add LOGO and Edit Proxy Default ERROR Pages

Goto IP > WEB PROXY
Click on RESET HTML
It will ask you that “Current html pages will be lost ! Reset anyway?” CLick on YES
As shown in the image below . . .
,
Now goto FILES and you will see webproxy/error.html ,
As shown in the image below . . .
Just copy this error.html file to your desktop and edit it using your favorite html editor.
(I personally use MS FRONTPAGE 2003 due to its easy and user friendly interface, You can use notepad to edit this file content as its very small and contains basic text only. just don’t mess with the codes, only change the text you want, for example network name support numbers etc. after saving , upload it back to Mikrotiok under web-proxy section.)

Howto Block Web Site for Single User

To block any website for a single user , Use the following …
1
2
3
/ip proxy access
add action=deny comment="Block yahoo for single user" disabled=no dst-host=www.yahoo.com src-address=192.168.2.5
(192.168.2.5 is the user ip)
To block single user and redirect him to your policy page on any loacl web server defining the reason why he is blocked , use the following.
1
2
/ip proxy access
add action=deny comment="Block yahoo for single user" disabled=no dst-host=www.yahoo.com redirect-to=192.168.2.3/policy/deny.htm src-address=192.168.2.5
(192.168.2.3 is the web server ip , & 192.168.2.5 is the user ip)
As shown in the image below . . .
.