

Here is how I got my MikroTik RB951-2n working with Internode’s native IPv6 serviceover ADSL. I did not nut all this out myself; there was googling involved, but nothing I found was complete and many articles assumed I knew more about MikroTik’s RouterOSthan I did. That said, all mistakes here are my own :-)
The Plan
The basic plan was to put an ADSL router/modem into bridge mode, and use the MikroTik to do all the heavy lifting.
An ADSL router/modem has (as its name would suggest) two functions. It acts as an ADSL modem, terminating an ADSL connection. And it acts as a router. In bridge mode, the router function is switched off; what remains is just an ADSL modem – it has ADSL on one side and ethernet on the other. In bridge mode, the device bridges ADSL into ethernet.
Ingredients
I used:
- an ADSL router that supports “bridge mode” (A TP-Link TD-W8950ND to be exact)
- a MikroTik router – in my case an RB951-2n, but I’d recommend the RB951G-2HnD instead
Configuring the ADSL router/modem
On small/cheap ADSL router/modems like the TP-Link, it’s usually necessary to reset them to factory defaults to get the device back out of bridge mode, so I made sure I had written down any special settings I had first. In particular, I checked that I had my Internode ADSL access credentials – username, password and so on.
Exactly how to put a given device into bridge mode differs for every manufacturer. In general you connect to the device, typically via a web interface, and go from there – that’s certainly how it worked with my TP-Link. Some ADSL router/modems can not be put into bridge mode (NetGear, I’m looking at you). If you are buying a device for this purpose, check first!
Putting the ADSL router/modem into bridge mode will cause you to lose connectivity to the ADSL router/modem. This is normal – in bridge mode, the device generally has no IP address, though, like some switches, some do retain a single static address to allow access and configuration. Higher-end devices typically have some kind of out-of-band configuration option such as as a serial port.
My ADSL router/modem was already working fine, so I could just drop it into bridge mode and carry on. If you are doing this with a new ADSL router/modem, it would be a good idea to make sure that your chosen device can in fact establish a connection with your provider before you put it into bridge mode. It’s much easier to set up any special requirements like VC parameters while the device is accessible.
From here on, I’ll just refer to the ADSL router/modem as the “modem”.
Connecting the MikroTik router
When the modem was running as a router, I had an ethernet cable running from one of its switch ports to a switch. To add the MikroTik, I unplugged that cable from the switch and plugged it into the MikroTik’s WAN port (ether1) instead. Then I ran a cable from one of the MikroTik’s switch ports to the switch.
Accessing the MikroTik router
As delivered, the MikroTik is configured as a home wireless access point, with the first ethernet port set up as a WAN interface, and the remaining four ethernet ports (and the wifi interface) bridged into a single switch, delivering IPv4 addresses via DHCP.
This means that you can connect to the MikroTik in two ways; either by associating with the open wireless network it presents (SSID “MikroTik”), or by connecting your computer via an ethernet cable to a free port (not the WAN port) on the MikroTik. Either way you get an IPv4 address in 192.168.88.0/24. Sadly IPv6 is disabled by default, so you will need IPv4 at least until you have IPv6 set up and configured on the MikroTik.
The MikroTik itself is at 192.168.88.1 by default.
Configuring the MikroTik router
The MikroTik can be configured via a web interface, a Windows program called winbox, or via the command line using telnet or ssh. I have found a combination of the web interface and ssh to be very effective. To be honest I haven’t tried winbox, because I don’t use Windows. By all accounts it works fine under Linux in WINE. (Update: Yep, works fine.)
I used the web configuration utility to do the basics, then the command line for some details – in particular the firewall rules, because one thing the web interface can’t do is re-order the firewall rules.
The first thing I did check that IPv6 was actually installed. The MikroTik was shipped with IPv6 installed, but disabled. To enable it, I went to the package manager, enabled the “ipv6″ package, and rebooted the router via “System->Reboot”.
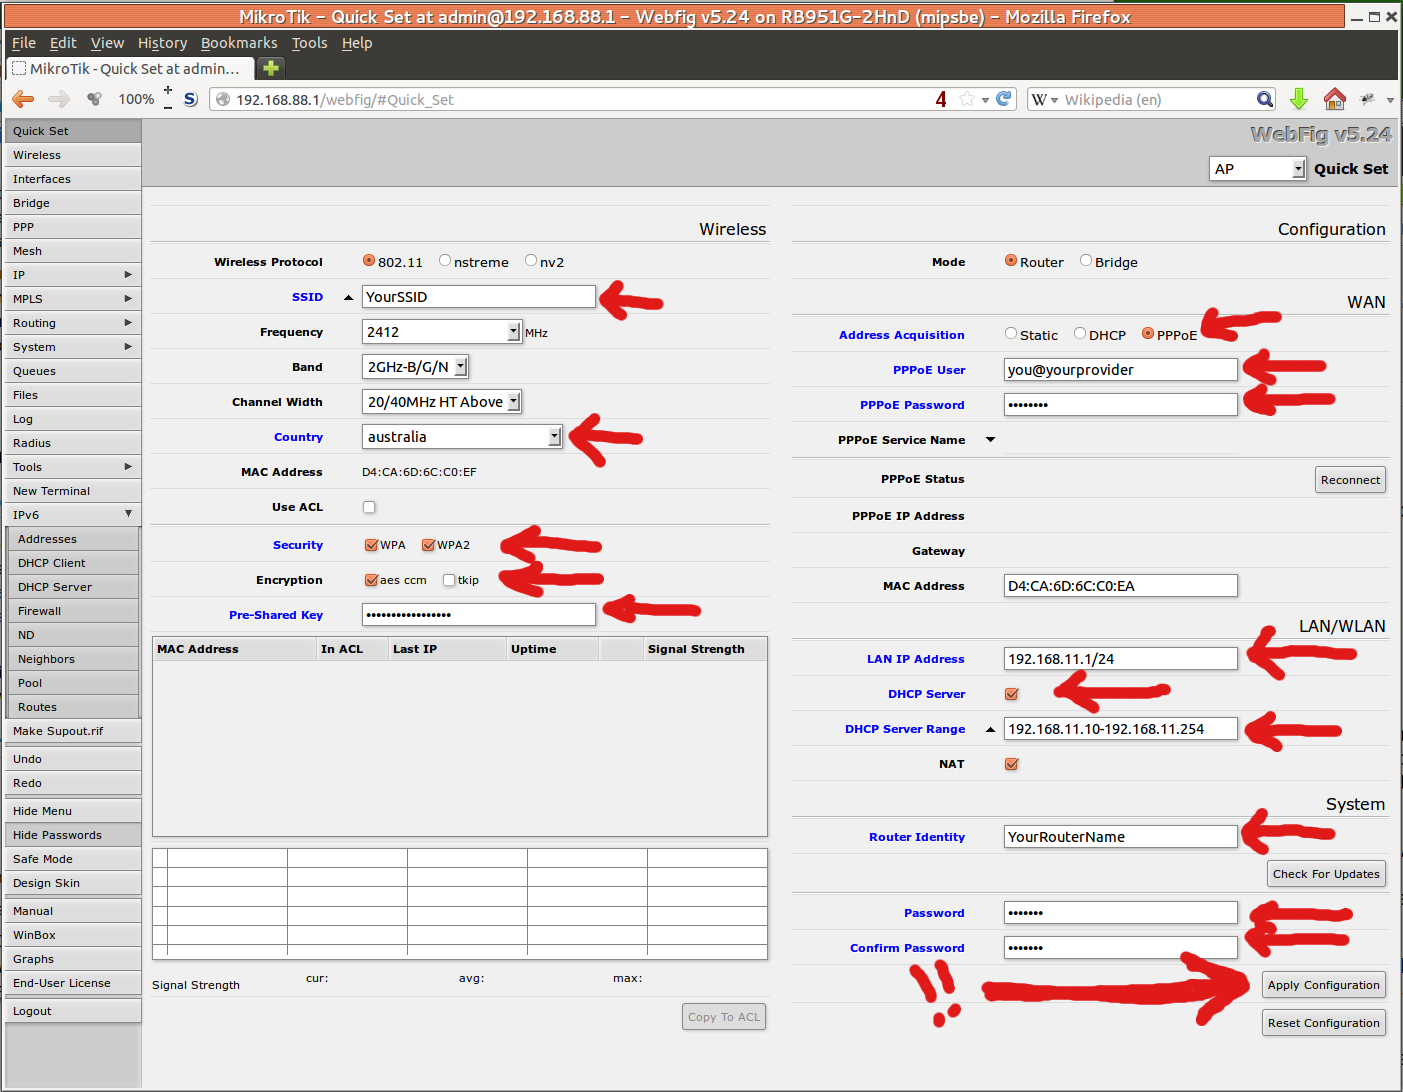
Out of the box, the MikroTik has no password protecting its admin interface, and the wifi network it presents is wide open. So before I set up the PPPoE connection, which would link the device to the Internet, I wanted to set the admin password to something reasonable, and set up WPA/WPA2 on the wireless network. This can be most easily done in the web interface, on the “Quick Set” page.
On this page, I set the SSID, the name of the router, the LAN address I wanted, then clicked “DHCP” and changed the DHCP range to match the LAN address. I set the wireless region to “australia” too :-)
The next step was to set up PPPoE. This is was as easy as the other steps – still on the “Quick Set” page, I changed “Address Acquisition” to “PPPoE” and set the “PPPoE User” and “PPPoE Password” fields to values appropriate for my ISP. The MikroTik immediately began trying to establish the PPPoE session. Because I had left the modem switched off, it could not succeed – but I wanted to get some basic firewall rules in place before opening myself to the Internet!
The basic firewall I set up is described in this article, “A simple IPv6 firewall for the the Mikrotik”. I set up essentially identical filters for IPv4. Note that the default IPv4 firewall on a MikroTik does not protect your network – it only protects the MikroTik. There is no default filtering for IPv6 at all :-)
Here’s a picture of the Quick Set page showing the fields I changed. If you are following in my footsteps, remember to click “apply configuration” when you’ve made all the changes you need, or the changes will be lost. Click the image to get it full-sized.
As soon as I clicked “apply configuration”, I lost connectivity, because the LAN address had changed. Also, the MikroTik’s wifi had changed SSID and was now secured. So I had to re-establish my connection to the router before I could proceed.
With my new filters in place, I turned on the modem – and the MikroTik connected to Internode without difficulty.
But what about IPv6?
All the above just got me to the same place I was before – a working IPv4 setup. The next step was to get IPv6 working.
My ISP, Internode, delivers native IPv6 using DHCPv6 prefix delegation. What this means is that the router sends a DHCPv6 request for a prefix, Internode answers, and the router then has all the information it needs to (for example) put subprefixes on LAN interfaces and so on.
I didn’t want to automate that process; I wanted to manually configure my network, but even though I knew the prefix Internode would send me, it was still necessary to do the DHCPv6 request – otherwise Internode would not know to route the prefix to me.
Setting up the DHCPv6-PD client involved going to the IPv6 menu, selecting “DHCP Client”, clicking “Add New”, telling it to run the client on the PPPoE interface (
pppoe-out1) and giving it a pool name to use – for example “internode”. There was no need to actually create a new pool manually – the pool was created automatically by the DHCPv6 client.
The next step is to tell the router that we want it to do Neighbor Discovery, that is, to advertise prefixes into the LAN. A click on “IPv6″, then “ND”, and “Add New” on the
bridge-local interface does the trick. The default, “all”, was too wide for me. The defaults are generally OK, but I found I had to set “Reachable Time” to some reasonable non-zero value – say 300. If it’s left at the default, zero, then Stuff Doesn’t Work.
And the final step is to put an IPv6 subnet on the LAN interface.
In this step, I put a subnet on the inside interface,
bridge-local. In IPv6, unless you know exactly what you are doing, you should always use 64-bit subnets, so I needed to take a /64 from the /56 that Internode sent me.
There are two ways to do this – manually and dynamically. Both start the same way – in the web interface, select “IPv6″, then “Addresses” then “Add new”.
To have the router select a prefix automatically, I could have put the pool name into the “From Pool” field and given “::1/64″ as the address. The subnet prefix would then have been the first available /64 prefix from the Internode /56.
However, I wanted to do it manually. That was easy – just don’t specify a pool, and dospecify the desired address in full.
All done!
At this point, the mechanics were all working. PPPoE was running, so there was an Internode globally routable IPv4 address on the outside interface,
ether1-gateway. Interestingly, the IPv6 address on the outside interface was just a link local address – there is no need for a routable address. DHCPv6-PD was running on the PPPoE virtual interface, pppoe-out1, and had obtained an IPv6 prefix from Internode. There was an address and a /64 subnet from that prefix on the bridge-local interface, and hosts on that link were seeing RAs on that link and autoconfiguring addresses.
Fired up Firefox, installed the IPvFox plugin, went to “www.google.com” and saw the magic green “6″:


I still have some tweaks to perform on the IPv6 Firewall, but it is working!
Eventually I want to use a single Mikrotik router to handle both of my ADSL connections.
Michael.